Done with
PSPX, but can be done in all versions
This
tutorial is done with just the shapes and brushes that comes
with PSP...
plus some effects....no outside plugins required
plus some effects....no outside plugins required
You also
will need the basic knowledge of layers and basic tools...
* My
preferences are, that I like everything on it's own layer,
so I can change whatever I need to
so I can change whatever I need to
Open new
image 500x500
Set both your
foreground/background to basic red...
Using the
round preset shape, draw a big circle...
New
Layer...set your foreground to basic green, but lock the
background layer...
Draw a smaller circle inside the red one....same settings as before...
Draw a smaller circle inside the red one....same settings as before...
New
Layer...set your foreground to basic yellow...lock the
background layer...
Draw a smaller circle inside the green layer....same settings as before...
Draw a smaller circle inside the green layer....same settings as before...
New
Layer...set your foreground to white....background layer
still locked...
Set your width this time to 5 and draw a circle inside the yellow...
Set your width this time to 5 and draw a circle inside the yellow...
You should
have this...

Merge Visable
Go to
Effects...Distortion Effects...Wave with these settings...

Duplicate this layer...hide the original...
On the
duplicate layer, use the selection tool and cut off the top
half...
Name this layer 'skirt'
Name this layer 'skirt'

Use the warp brush...
and warp
the left and right site of the skirt

(Do not
forget to 'apply' (green check)
every time you use the
warp brush)
Duplicate
that layer and name it 'shawl'...and hide that layer for
now...
New
Layer...Foreground/background basic red...Preset...Ellipse
Tool....
Draw an upper body...and move below the skirt...
Draw an upper body...and move below the skirt...

Open up the
Shawl and resize to about 75%
(you might need to do more)
Place it
above the upper body...

Duplicate
the shawl and resize to 75%...place it on top of the
skirt...resize as needed

As you can
see by this time I've resized the upper body...
and the skirt was resized before...
and the skirt was resized before...
New
Layer....foreground/background basic red...
Ellipse tool and draw an ellipse for the sleeve...
Place it to the left at an angle...
(I used the warp brush again, smaller size, to puff up the sleeve)
Ellipse tool and draw an ellipse for the sleeve...
Place it to the left at an angle...
(I used the warp brush again, smaller size, to puff up the sleeve)

Click on
the 'Shawl' and duplicate...Resize to
50%...and place it over the sleeve...Use the
Raster deform tool to place it right (resize as
needed)

Now go to
Layers...View...None...
Unhide the sleeve and the resized shawl...
on the sleeve layer, go to Layer...Merge Visible...
Unhide the sleeve and the resized shawl...
on the sleeve layer, go to Layer...Merge Visible...
Duplicate it and mirror...
Layers...View...All...
Place the duplicated arm on the other site...
Layers...View...All...
Place the duplicated arm on the other site...

New
Layer....foreground/background black...Ellipse
Tool...draw a small circle for the head...
and place above the shawl...
and place above the shawl...

New
Layer...foreground/background black...Ellipse
Tool...draw an ellipse long
Using the
Raster Deform Tool...move it a bit to the left...
Duplicate this layer...mirror...and move in place...
Duplicate this layer...mirror...and move in place...
It will
look something like this...

Remember
the original layer?
Unhide that
one...it's way too big, so go to image...resize...50%...
Place on top of the head...(you might have to resize it again to your liking)
Place on top of the head...(you might have to resize it again to your liking)
Ok...now
for the arms and legs...
New
Layer...foreground #f4a368 and background #f5b98d
Draw an
ellipse like this...

Move it
underneath the skirt...
New
Layer...foreground/background...black
Use the Freehand Selection tool....Point to Point...
Make a selection like a shoe...
Use the Freehand Selection tool....Point to Point...
Make a selection like a shoe...
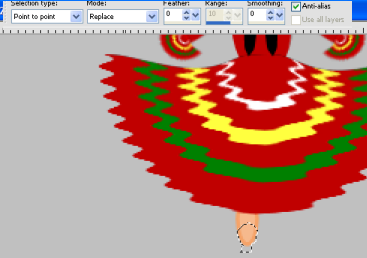
Fill with
black..deselect...
With your
freehand selection tool, feather 1
Go around
the outside of the leg on each site to shape it...
Do the same with the shoe
Do the same with the shoe

Now go to
Layers...View...None...
Unhide the leg and the shoe...
on the leg layer, go to Layer...Merge Visible...
Unhide the leg and the shoe...
on the leg layer, go to Layer...Merge Visible...
Duplicate it and mirror...
Layers...View...All...
Place the duplicated leg on the other site...
Push it up a bit...and rotate...
Layers...View...All...
Place the duplicated leg on the other site...
Push it up a bit...and rotate...

New
Layer...foreground #f4a368 and background #f5b98d
Draw an ellipse...
Draw an ellipse...

Move that
layer underneath the left arm...
Duplicate and Mirror and place on the other site...
Duplicate and Mirror and place on the other site...
With your
freehand selection tool, feather 1
Go around the outside of the arms on each site to shape it...
Go around the outside of the arms on each site to shape it...
Nearly
there...
Now before
I Merge all the Layers, I use the airbrush on the arms and legs
with a darker and lighter color here and there to make some shadows
Whitish color for the shoes...
with a darker and lighter color here and there to make some shadows
Whitish color for the shoes...
Then
smudge with the same settings...
(you might need to
change your size, depending how big you made your girl :-)
Note: To Not go
outside the edges, make sure your 'lock transparency' is set
in your layer palette!
I also used
the airbrush and smudge for the braids...
Ok...now
for some fun...
Merge all
Layers 'Visable'
We are
going to use the Lighten/Darken Tool for the shades...
First use
the Darken Brush...on the skirt brush up and down here and
there...
Then the Lighten Brush...(uncheck the Swap mouse button on the menubar)
Resize the brush as needed...
Then the Lighten Brush...(uncheck the Swap mouse button on the menubar)
Resize the brush as needed...

Make the
brush smaller when you do the bodice and the sleeves...
When you're
happy with it, change the brush to Paint with red color
and small size to paint a ribbon on the plaits...
and small size to paint a ribbon on the plaits...
And that's
it! You've done it!
Hope you've
enjoyed this tutorial and it wasn't too hard to follow...